
How to use the Oxide app: knobs, GREENLIGHT and batch
Short answer: install Oxide, load a stem and scan it. Start with Surgical, use DEGLAZE for metallic top-end residue, and compare the result with Raw Input at matched loudness. Check Delta Solo: you want removed shimmer and fizz, not words, breaths or drum attacks. GREENLIGHT helps you inspect the stem; your ears decide whether the cleanup belongs in the mix.
On this page
Choose the app, browser or plugin
This Oxide app tutorial covers the controls you use to inspect and clean a stem, rather than a one-size-fits-all preset. The four modules share the same macros and Fine Tune drawers in standalone, the plugin and Web Studio.
| Where you work | When to choose it | What to remember |
|---|---|---|
| Standalone app | You want to check a file, review a folder or prepare stems for any DAW. | This is the fully supported desktop path. Pro or Studio unlocks WAV export and folder rendering. |
| Browser Web Studio | You want a quick listen and a look around before installing. | Lite includes the full cleanup recipe. The browser folder list is a demo preview, not a way to render your own folder. WAV export never happens here. |
| VST3 / AU / CLAP plugin | You want to hear cleanup in the context of a DAW session. | Plugins are in beta. If one does not load, use standalone and import the cleaned file. |
There is no AAX version for Pro Tools. Clean in standalone and import the WAV; see the Pro Tools workflow. For other hosts, start with Oxide DAW setup.
Your audio file stays on your computer. A scan sends a small numerical summary, not the playable audio, and cleanup runs locally.
Download and install on macOS or Windows
Download the installer from the official Oxide site, rather than a re-upload or an unknown link. Only approve an installer you deliberately downloaded from that site.
- Windows: if the browser says the file is not commonly downloaded, choose Keep, then Keep anyway. If opening it shows “Windows protected your PC”, choose More info → Run anyway. If Windows asks whether to allow the unknown publisher to make changes, approve it only after checking you have the intended Oxide installer.
- macOS: run the package installer. If Gatekeeper asks for permission, check System Settings → Privacy & Security and allow the intended installer or app there.
- Open the standalone app from your applications list. Start there if you are checking the installation itself; it separates an app problem from a DAW plugin-loading problem.
- If you have Pro or Studio, enter your licence key to unlock the paid features. Otherwise start with Lite.
Do not disable system security globally to install a plugin. If the expected installer still will not open, use the support form.
Set up audio devices, sample rate and buffer size
Before judging the sound, check the app’s audio device settings (sample rate and buffer size). Choose the output you actually listen through, then check these two different settings:
- Sample rate: 44.1 kHz or 48 kHz. Oxide’s cleanup work includes the 14–18 kHz region. At 32 kHz, the upper limit is 16 kHz, so much of that region is missing and the spectrum or meters can look wrong. A 44.1 or 48 kHz device/project is the useful starting point. Changing the rate cannot restore high frequencies already missing from a source file.
- Buffer size: increase it if playback crackles. A larger buffer gives the computer more time to process audio. In testing, crackle at 512 samples went away at 1024 or 2048. Those are troubleshooting steps, not a mandatory setting for every computer. Buffer size is not sample rate.
Inside a DAW, set these in the DAW. In REAPER, for example, use Options → Preferences → Audio → Device. Keep the project and audio device at a suitable rate too. The REAPER guide covers that host’s workflow.
Bluetooth and USB headsets can switch into low-quality call mode when their microphone is selected as the input. If everything sounds thin, even with Oxide bypassed, check that before adjusting any cleanup knob. Prefer the computer’s speakers or a normal audio interface for the test. If you use a headset, avoid using its microphone as the audio input.
Your first stem: scan, listen and compare
- Load one stem. Use the best original export you have. Converting a compressed MP3 into WAV does not recover lost detail.
- Listen to Raw Input. Find a short section with the actual problem: a glassy vocal tail, a metallic pad, fizzy cymbals or a whistle above the music. Distinguish residue on the sound from another instrument leaking into a separated stem. Cleanup is not a replacement for better separation.
- Run a scan. Read the GREENLIGHT summary, but keep your listening reference. Lite includes the full cleanup recipe.
- Start with Surgical. It is the default, more transparent cleanup choice. Adjust DEGLAZE only as far as the sound needs.
- Enable Auto-Match Output Loudness for comparison. A louder version can seem better even when it is not cleaner.
- Check Delta Solo, then return to the full signal. If the removed sound contains words, breaths or drum attacks, back off. Check the stem in the mix, not only in solo.
- Export from desktop with Pro or Studio when satisfied. A high CLEAN percentage is not a reason to keep a pass that weakens the performance.
If you came here to learn how to clean Suno stems, use that listening checklist alongside the controls below. Not every stem needs every module.
The four Oxide knobs and Fine Tune drawers
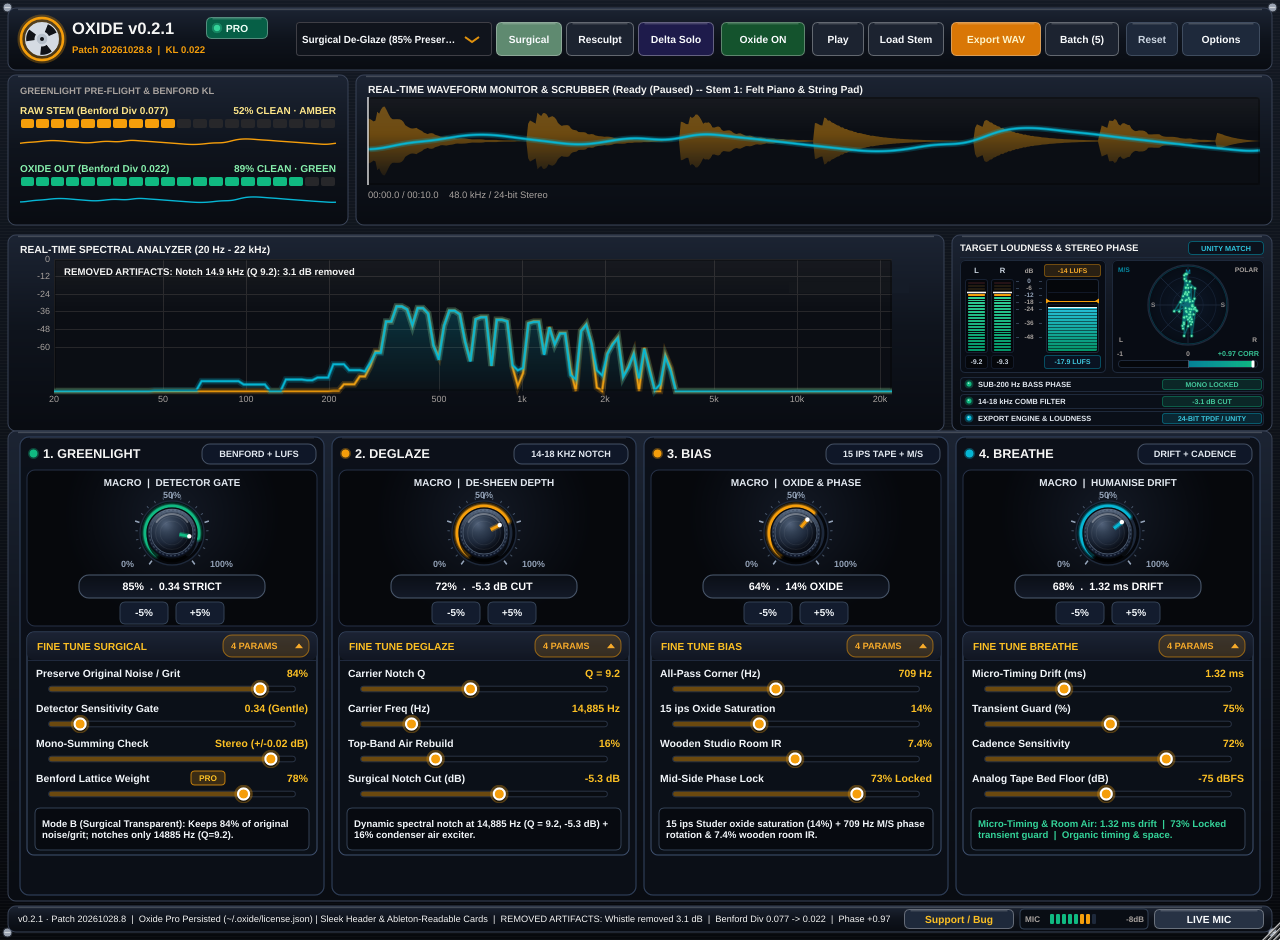
Drag a rotary knob to change it. Double-click to reset it. The four large macros should not move when you scroll the page or rack; do not use the scroll wheel as the adjustment method.
| Module → macro | What it does | When to reach for it |
|---|---|---|
| GREENLIGHT → DETECTOR GATE | Adjusts how strictly the pre-flight inspects the stem. | You want to review inspection sensitivity, not turn up an audio effect. |
| DEGLAZE → DE-SHEEN DEPTH | Controls cleanup aimed at metallic or glassy top-end sheen and whistle. | The high end carries stationary fizz or glaze that does not belong to the instrument. |
| BIAS → OXIDE & PHASE | Brings together tape feel, phase work and room character. | The sheen is controlled, but the stem needs a different feel or a mono-compatibility check. |
| BREATHE → HUMANISE DRIFT | Adds micro-timing drift for a rigid, grid-like feel. | You want to explore movement without losing attacks or phrasing. |
A macro is the broad move. A Fine Tune drawer lets you work on a named part of that module. Make one change, compare, and keep it only if it helps. Do not open all the drawers just because they are there.
GREENLIGHT: DETECTOR GATE
GREENLIGHT carries the INSPECTOR tag. Its macro, DETECTOR GATE, is aimed at how strictly the pre-flight reads the stem. It is not a “remove everything” control, and a more flattering reading is not evidence of better sound.
The Fine Tune controls are:
- Preserve Original Noise / Grit: use this when deliberate texture, breath or roughness is part of the performance. Judge preservation by listening, especially in Delta Solo.
- Detector Sensitivity Gate: the finer adjustment for inspection sensitivity. Use it when reviewing how the inspection responds, not to chase a colour.
- Mono-Summing Check: use this when the stereo stem loses body or changes character in mono. Compare the listening result with the phase display.
- Score weighting (PRO): changes how much the Benford reading influences the composite GREENLIGHT score. It is a weighting control, not a separate cleanup effect.
DEGLAZE: DE-SHEEN DEPTH
DEGLAZE carries the 14–18 kHz NOTCH tag. Reach for DE-SHEEN DEPTH when a vocal, pad or cymbal has that glassy, metallic layer riding above the musical sound. Stop when the residue is reduced; do not keep going until the instrument loses its air.
Its Fine Tune drawer exposes cut depth (dB), Carrier Notch Q, Carrier Freq Hz and Top-Band Air Rebuild. Cut depth is how much attenuation is applied; Q concerns how narrowly the notch is focused; frequency identifies where it is centred. The public UI shows a default carrier value of 15,800 Hz. That is a labelled starting value, not a prescription for every file.
Top-Band Air Rebuild is the control to revisit if you need to balance the cleaned top end with air. Compare at matched loudness and return to Delta Solo after changing depth or focus. If it sounds duller rather than cleaner, ease back before trying to compensate with more processing.
BIAS: OXIDE & PHASE
In the web preview this panel is labelled DRIVE and shows the Drive control only; BREATHE is desktop-only.
BIAS carries the 15 IPS TAPE + M/S tag. In Character mode, use it after the sheen is under control, when you want to consider tape-style warmth, the side-level trim and room rather than more de-sheening.
The named Fine Tune controls 15 ips Oxide Saturation and Wooden Studio Room IR run in Character mode, adding tape-style saturation and room blend respectively. A side-level trim also runs only in Character mode. Listen for whether the added character suits the stem, and whether the centre holds together in mono. More room or saturation is a creative choice, not automatically a cleaner result.
Compare Surgical with Resculpt before committing. If the transparent pass already does the job, you do not need to add tape-style warmth just to use the rest of the rack.
BREATHE: HUMANISE DRIFT
In the web preview, BREATHE is desktop-only and is not shown.
BREATHE carries the DRIFT + CADENCE tag. HUMANISE DRIFT is the real UI name: here it means micro-timing drift for a rigid, grid-like feel. It is not a way to disguise a source or a promise to make a recording “pass” anything.
The Fine Tune drawer contains Micro-Timing Drift, Transient Guard and Cadence Sensitivity. Reach for drift when you want to audition small timing movement. Pay attention to Transient Guard when attacks need to stay clear, and review Cadence Sensitivity alongside the cadence readout rather than assuming every vocal needs the same setting.
Under BREATHE, the vocal-envelope and syllable-onset readout gives extra context for vocal phrasing and onset spacing. Look at it when listening to cadence, breaths and timing; it does not replace listening to the words. Check drums and plucks carefully after drift changes. If the groove or attack becomes worse, reduce the change.
Read the GREENLIGHT bar and detail bands
The Oxide GREENLIGHT Pre-Flight Diagnostic uses a 0–100% CLEAN scale. Higher percentages and more green mean cleaner, more natural readings. “96% CLEAN · GREEN” and “15% CLEAN · RED” are example UI states, not targets promised for your file. Red asks for attention, amber asks for review, and green is a useful studio indication rather than permission to stop listening.
Scope: GREENLIGHT measures 14–18 kHz vocoder comb lines, phase pinning, and sub-band mantissa patterns against known AI-generator artifact patterns. Use this readout as a studio pre-flight check, not a blanket guarantee. It is not a detector you need to “pass”, and it makes no promise about distributors.
After a scan, use the bands to decide what deserves a closer listen:
| Visible band | What it is telling you | When to look |
|---|---|---|
| 1. High-Band Vocoder Glaze (14–18 kHz) | Whether the high-band pattern resembles the glaze the inspection is looking for. | You hear metallic fizz, whistle or a glassy top layer. Compare with the spectrum and DEGLAZE. |
| 2. Stereo Phase Coherence | A view of stereo/phase behaviour. | A wide stem becomes thin or changes markedly in mono. Compare with the M/S polar display. |
| 3. Transient Punch & Room | Inspection context for attacks and room character. | Drums or plucks feel flattened, or tails need a closer listen. Do not add room on the strength of a number alone. |
| 4. Benford Sub-Band Mantissa / KL Divergence (PRO) | A statistical view of the distribution of numerical audio values. | You want a second opinion alongside your ears and the glaze band. |
The 5-band GREENLIGHT breakdown and Benford readout are Pro/Studio unlocks. Lite still scans with the full cleanup recipe. The public screen groups some additional detail into the optional carrier/cadence drawer; do not expect every diagnostic to be a separate knob.
What the Benford readout means
Band 4 compares sub-band mantissas with a natural Benford-like distribution using KL divergence. In plain language, it checks how the numerical values are distributed, rather than judging whether the tune or performance is good.
LOW divergence means those numbers look more like ordinary audio. The public UI gives an example around 0.019 · LOW. Higher divergence means more lattice-like or clustered values, a pattern that often appears with generator residue. That example is not a universal cutoff, a probability that a track came from a generator, or proof of a source.
Look at the Benford readout after a scan if you want a second opinion besides your ears and the 14–18 kHz glaze band. If the number and your listening disagree, investigate the source and compare the audio; do not process harder just to change the number.
The Score weighting slider is marked PRO, with 65% shown in the public UI example. It changes how much this reading influences the composite GREENLIGHT score. Changing the weight changes the emphasis of the assessment; it does not prove that the stem itself improved. Keep it as an inspection choice, not a score to game.
Carrier and cadence telemetry
Expand Carrier Watermark & Cadence Telemetry if you want more inspection detail. It contains Read-Only Carrier Watermark Check and Acoustic Onset & Syllable Cadence.
These are extra read-only telemetry, not instructions or tools for hiding watermarks. Use the cadence view when inspecting a vocal’s onset spacing and phrasing, and the carrier view as additional diagnostic context. Neither overrides the musical result or turns GREENLIGHT into a guarantee.
Use the spectrum, LUFS and stereo display
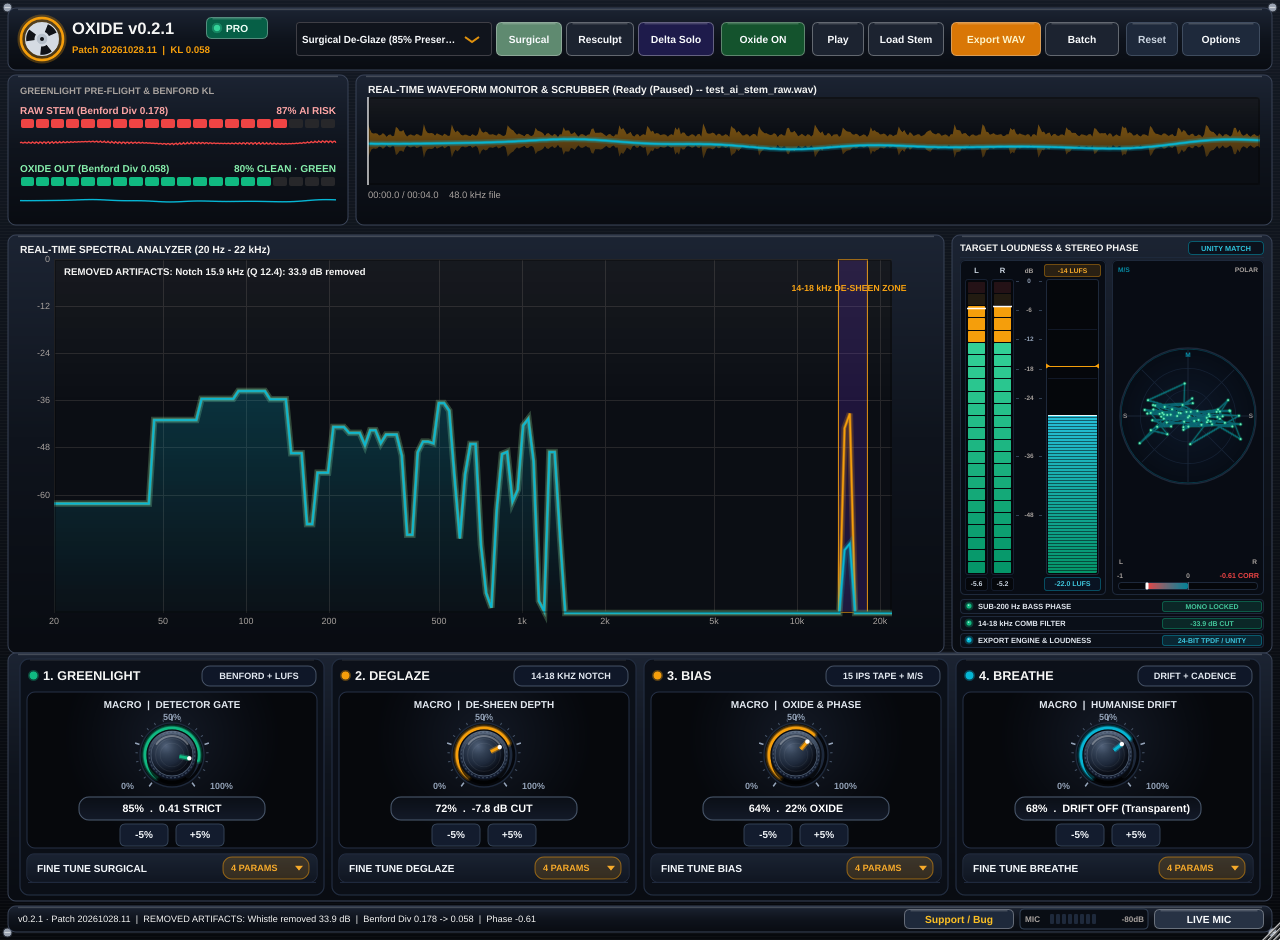
The spectrum spans 20 Hz–22 kHz, with the 14–18 kHz sheen/glaze zone called out. Use it to locate a persistent high-band feature while the suspect passage plays. A bright line is a clue, not an instruction to remove all high frequencies: cymbals, breath and instrument air belong up there too.
The waveform gives you a time reference for the passage you are auditioning. Return to the same section for each comparison so that a louder chorus is not being compared with a quieter verse.
Glance at LUFS when comparing Raw Input and processed output. Use Auto-Match Output Loudness (±0.0 dB Unity) for fair A/B listening; this is about removing the loudness advantage, not forcing every stem to a mastering target.
Glance at the M/S polar display when centre stability or mono compatibility is the concern. Listen in mono as well. A display can help you notice a change, but cannot decide whether that change suits the arrangement.
Compare the four output states and Delta Solo
| Output state | What you hear | Why you would select it |
|---|---|---|
| STATE 1 · RAW INPUT (BYPASSED) | The unprocessed reference. | Remind yourself what was actually wrong, and check whether a playback issue exists without processing. |
| STATE 2 · SURGICAL | The default, more transparent cleanup. | Start here when you want residue reduced without deliberately adding tape-style warmth. |
| STATE 3 · RESCULPT | Resculpt adds tape-style warmth in Character mode. | Audition a different feel after the sheen is under control. Compare its musical fit, not only the inspection reading. |
| STATE 4 · Δ DELTA SOLO | Removed artifacts, heard at unity. | Check what the cleanup is taking away before accepting the pass. |
Delta Solo is a listening tool, not an alternative final mix. You should hear shimmer and fizz, not intelligible words, breaths or drum attacks. If you hear important performance detail, reduce the cleanup and compare again. Return to the normal output state before making your final listening decision or export.
Do not confuse output-state numbers with the batch window’s processing-mode numbers. An official batch capture calls Surgical “Mode 1” and Resculpt “Mode 2”; select by the name, not by assuming those numbers match the four output states.
Use the Options menu
Open Options ▾ when you need licence, workspace, comparison or reporting actions rather than another sound adjustment.
| Exact menu label | When to use it |
|---|---|
| License Tier (Pro / Studio) | You need to review the paid tier in use. |
| Hide Built-In Demo Stems (PRO) | You want your own stems in a less cluttered workspace. |
| Auto-Match Output Loudness (±0.0 dB Unity) | You are comparing raw and processed sound and want a fair loudness-matched listen. |
| Reset All Individual Fine-Tune Slider Offsets | You have made several fine adjustments and want to clear those offsets before reassessing. |
| Toggle All Fine-Tune Drawers | You want to show or hide the detailed controls together. |
| Log a Bug / Report Issue... | Something is not working as expected. |
| Request a Feature / Idea... | You have a workflow improvement or feature suggestion. |
| Report Stem / Tune Recipe | A particular stem needs a closer diagnostic look or recipe feedback. |
The reset action names individual Fine-Tune slider offsets. Do not assume it resets every app preference or solves an audio-device issue. If your aim is fair comparison, start with Auto-Match rather than resetting everything.
You can also Log feedback or request a feature on the website. The form heading is “Log a Bug, Request a Feature, or Submit Stem Triage”. It covers feedback and ideas as well as faults.
Batch a folder and export WAVs
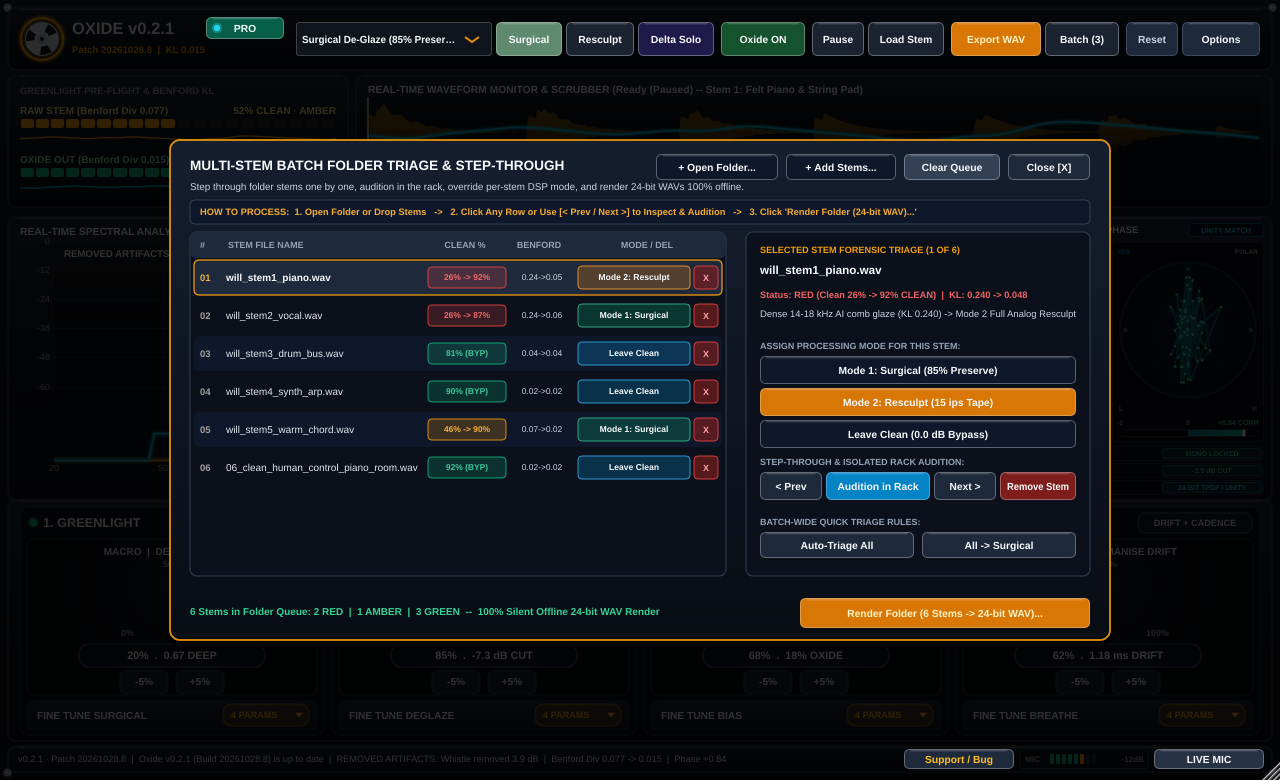
Oxide batch is not a reason to apply the same amount of cleanup to every file. A vocal, a pad and a drum stem can need different decisions.
- Drag a folder into standalone. Lite batch is capped at 3 stems. Use Pro or Studio for folder rendering.
- Inspect each stem. Review the per-stem CLEAN indication and, with the paid breakdown, the Benford context. Start with files that need attention rather than treating green as a mandate to process.
- Step through and audition. Open the selected stem in the rack, compare its raw and processed sound, and check Delta Solo. Listen to a representative section, including attacks or vocal consonants.
- Assign Surgical, Resculpt or Leave Clean. Choose Surgical for more transparent cleanup, Resculpt for tape-style warmth in Character mode, and Leave Clean when processing does not help.
- Render 24-bit WAVs with Pro or Studio. Review your choices first. The exports stay the same length and start on the same sample as the originals so they line up back in the DAW.
- Check them in the session. Import the results at the original positions and listen in context before replacing the source in your working mix.
WAV export happens in the desktop app or plugin, never in the browser. The browser can preview a demo folder list; checking your own files and folder rendering happen in desktop or the plugin. Standalone is the supported fallback if the beta plugin does not load.
Lite, Pro and Studio limits
| Tier | What you get | Machines | Batch and paid features |
|---|---|---|---|
| Lite | Try free with the full cleanup recipe. | Start free; no paid machine allowance is implied here. | Batch capped at 3 stems. Paid export and detailed breakdown remain locked. |
| Pro | All of Oxide unlocked. | 2 machines. | £7/mo or $9/mo; unlocks 24-bit WAV export, the 5-band breakdown, Benford readout and folder rendering. |
| Studio | Everything in Pro, on 5 seats. | 5 machines. | £19/mo or $24/mo; unlocks the same paid export, inspection and folder-rendering features. |
Lite is not inspection-only: it includes the full cleanup recipe. A cloud scan and a local knob adjustment are different things; do not assume every listening change is another scan.
For a first try, open Oxide or download the desktop app. If export is your next step, use the installed app or plugin with Pro or Studio.
Troubleshoot and log feedback
| What you notice | What to check first |
|---|---|
| Crackles during playback | Increase buffer size. Try 1024 or 2048 if 512 crackles, then compare the same passage. |
| Thin playback even in bypass | Check whether the headset microphone has put the device in call mode. Test speakers or an audio interface. |
| The high-band spectrum looks wrong | Check the device and project rate. Use 44.1 or 48 kHz rather than 32 kHz; an upsampled source cannot regain missing content. |
| The result is dull, or Delta Solo contains words or attacks | Reduce cleanup depth and revisit the relevant Fine Tune changes. Do not chase a greener number. |
| The plugin does not load | VST3 / AU / CLAP are in beta. Use standalone, then import the WAV. Pro Tools needs that route because there is no AAX version. |
| WAV export is unavailable | Check that you are in desktop or the plugin with a Pro or Studio licence. The browser does not export WAVs. |
| Need WAV export or folder render | Those are part of Pro. Try Oxide Lite free. Pro unlocks everything. |
| One stem still behaves unexpectedly | Use Report Stem / Tune Recipe, or the support form, and describe what you hear rather than only quoting a score. |
To Log feedback or request a feature, include your operating system, app or plugin context, DAW if relevant, device sample rate and buffer size, the steps you took, and what you expected to hear. A screenshot of the relevant readout is more useful than “it sounds wrong” alone. Do not include a licence key in a public screenshot.
Related stem and DAW guides
For listening decisions, read how to clean Suno stems, how to clean Suno vocals, why Suno sounds metallic and what shimmer means, and how to clean up an AI song before mastering.
For installation and host workflows, use Oxide DAW setup, then your host: REAPER, Ableton Live, Logic Pro, FL Studio, Cubase, or Pro Tools.
Common questions
What do the four Oxide knobs do?
GREENLIGHT’s DETECTOR GATE adjusts inspection strictness. DEGLAZE’s DE-SHEEN DEPTH targets metallic top-end sheen. BIAS’s OXIDE & PHASE addresses tape feel, phase and room. BREATHE’s HUMANISE DRIFT adds micro-timing movement for rigid, grid-like feel. Drag a rotary to adjust it and double-click to reset it; do not use scrolling to adjust the four big macros.
What does Oxide GREENLIGHT mean?
GREENLIGHT is a studio pre-flight check on a 0–100% CLEAN scale: higher percentages and more green mean cleaner readings. It measures high-band glaze, phase behaviour and numerical artifact patterns. It is not a blanket guarantee, proof of a source, or a promise about distributors. Listen to the result before accepting it.
What does the Benford readout mean?
It is a statistical check using KL divergence of sub-band mantissas against a natural Benford-like distribution. LOW divergence looks more like ordinary audio; higher divergence means more clustered, lattice-like values that often appear with generator residue. Use it as a second opinion, not a score to game. The readout and Score weighting control are Pro/Studio features.
What should I hear in Delta Solo?
Delta Solo plays the removed artifacts at unity. You want shimmer and fizz, not words, breaths or drum attacks. If important performance detail appears there, reduce the cleanup and compare again, then return to the full output to judge the result.
What is the Oxide Lite batch cap?
Batch Triage in Lite checks up to 3 stems; batch folder render is part of Pro. Try Oxide Lite free. Pro unlocks everything.
Can I export a WAV in the browser?
No. WAV export never happens in the browser. Export 24-bit WAVs from the installed desktop app or plugin with Oxide Pro or Oxide Studio. Use standalone if the beta plugin does not load.
Which audio device sample rate should I use?
Use 44.1 kHz or 48 kHz for the audio device and project. At 32 kHz, much of the 14–18 kHz cleanup region is missing, so the spectrum or meters can look wrong. Check the app’s audio device settings, or the DAW’s device settings when using a plugin. Changing sample rate cannot restore missing source detail.
Why does playback crackle or sound thin?
For crackles, raise buffer size; testing found that 1024 or 2048 samples resolved crackle heard at 512. For thin sound even in bypass, check headset call mode: using a Bluetooth or USB headset microphone as input can reduce playback quality. Test speakers or an audio interface, or avoid using the headset mic as input.
Does Oxide upload my audio?
No. Your audio file stays on your computer. A scan sends a small numerical summary, not the playable audio, and cleanup runs locally.
Where can I log feedback or request a feature?
Use the Options menu actions Log a Bug / Report Issue..., Request a Feature / Idea..., or Report Stem / Tune Recipe. You can also use the Oxide support form, headed “Log a Bug, Request a Feature, or Submit Stem Triage”, at https://oxide.battleship.me/#support.